USPS Mail Integration With Home Assistant
Want to see your USPS mails in Home Assistant? Follow the elaborate steps to automate that…
Update 11/1/2019: Added code to exclude advertisements that USPS decided to shove in the informed delivery mails.
USPS Mail Integration With Home Assistant

Before you go any further, you need to signup to the USPS web site, and subscribe for “Informed Delivery” of both mails and packages for this component to work. This also assumes you live in the USA.
I want to give credits to @vasiley for pointing me to a python code written by @arychj that attempts to retrieve USPS mail/package related information. I borrowed the idea, and expanded it to integrate with MQTT and automatically create a GIF image to show on the Home Assistant GUI. In case of no mails for a specific day, it deletes the old GIF and replaces todays_mails.gif with nomails.gif, so that you know there are no mails for you waiting in the mail box. Save this nomails.gif in your Home Assistant’s www folder, or create your own image.
NOTE: There is no guarantee that this code works 100% [ALL] the time. It works great for now, and will continue to keep it current as much as possible. Reason being, the USPS does not provide any API to query the information, and the existing USPS sensor in Home Assistant breaks all the time because it uses screen scraping technique to retrieve the data. Whenever the USPS developers change their web site, or the email formats, there is a higher probability that this will break.
Prerequisites
You need Python’s MQTT Paho Library for this code to work. Install it using the following command if you have not already done.
sudo pip install paho-mqtt
You also need imagemagick software that converts bunch of images to an animated GIF. Install using the following command.
sudo apt-get install imagemagick
Note: After installing the above software(s), make sure you restart the server just to be sure.
Here is the Home Assistant Package that reads the information from MQTT and shows the mail images using camera component.
Home Assistant Package
Create a file in your Home Assistant setup, and paste the contents below. There is nothing you need to do from Home Assistant stand point, as the package creates all the necessary sensors, groups and camera components for you. You can always change/organize the way you want, create views and such.
homeassistant:
  customize:
    sensor.usps_mail:
      friendly_name: USPS Mail
    sensor.usps_packages:
      friendly_name: USPS Packages

group:
  USPS:
    entities:
      - sensor.usps_mail
      - sensor.usps_packages
      - camera.usps_mail_pictures

sensor:
  - platform: mqtt
    name: 'USPS Mail'
    state_topic: '/usps/mails'
    value_template: "{{ value }}"

  - platform: mqtt
    name: USPS Packages
    state_topic: '/usps/packages'
    value_template: "{{ value }}"

camera:
  - platform: generic
    name: USPS Mail Pictures
    still_image_url: 'http://192.168.xxx.xxx:8123/local/todays_mails.gif'
The Python Program
The following python program (usps.py) basically logs into the e-mail server using email account’s username and password. Please note that the program DOES NOT use USPS website’s username and password - unlike the Home Assistant USPS component. The program checks for mails that came from USPS, and if there are any mails for that particular day in the inbox or a specified mailbox, it retrieves the embedded images from that e-mail, and stitches them together as an animated image (GIF), and saves that GIF into Home Assistant’s www folder (this is the default setting, of course, you can change the path). That GIF image is then displayed in Home Assistant UI using camera component with the image path as the source. Please see the camera component in the USPS Package.
The code also publishes the number of mail(s) and package(s) into MQTT under respective configurable topics, and with the help of MQTT sensors, the information auomatically gets updated in Home Assistant. You can then create automations, scripts…etc based on that sensor values.
Please make sure you change the username, password and other relevant information in the python file before you run the program.
Also, if you use other email providers like gmail, or yahoo, make sure you give correct imap server host name and port numbers. The following are for GMail, Yahoo, and Outlook email providers. If you use other than these, please contact your email provider to get the host address and port information.
| EMail Provider | Host Address | Port |
| GMail | imap.gmail.com | 993 |
| Yahoo | imap.mail.yahoo.com | 993 |
| Outlook | imap-mail.outlook.com | 993 |
NOTE: If you use 2-factor authentication, you may have to create an “App” password in your mail/account security settings, and use that “App” password as your password in the program.
#!/usr/bin/env python

"""
Make sure you change the parameters - username, password, mailbox,
paths and options.
"""

import email
import datetime, imaplib, re, sys
import os
import time
import subprocess
import paho.mqtt.client as mosquitto
from shutil import copyfile

# MQTT Server Address and Port
MQTT_SERVER = "192.168.xxx.xxx"
MQTT_SERVER_PORT = 1883

# MQTT User name and Password
MQTT_USERNAME = "mosquitto"
MQTT_PASSWORD = "xxx"

MQTT_USPS_MAIL_TOPIC = "/usps/mails"
MQTT_USPS_PACKAGE_TOPIC = "/usps/packages"

SLEEP_TIME_IN_SECONDS = 300

HOST = 'imap-mail.outlook.com'
PORT = 993
USERNAME = '[email protected]'
PASSWORD = 'xxx'
folder   = 'inbox'

GIF_FILE_NAME = "todays_mails.gif"
GIF_MAKER_OPTIONS = '/usr/bin/convert  -delay 300 -loop 0 '
IMAGE_OUTPUT_PATH = '/home/homeassistant/.homeassistant/www/'

# Login Method
###############################################################################
def login():
    account = imaplib.IMAP4_SSL(HOST, PORT)

    try:
        rv, data = account.login(USERNAME, PASSWORD)
        print_message ("Logged into your email server successfully!")
    except imaplib.IMAP4.error:
        print_message ('Failed to authenticate using the given credentials. Check your username, password, host and port.')
        sys.exit(1)

    return account

# Select folder inside the mailbox
###############################################################################
def selectFolder(account, folder):
    rv, mailboxes = account.list()
    rv, data = account.select(folder)
    print_message ("Selecting folder '{}'".format(folder))

# Creates GIF image based on the attachments in the inbox
###############################################################################
def get_mails(account):
    today = get_formatted_date()
    image_count = 0

    rv, data = account.search ( None,
                              '(FROM "USPS" SUBJECT "Informed Delivery Daily Digest" SINCE "' +
                              today + '")')
    if rv == 'OK':
        for num in data[0].split():
            rv, data = account.fetch(num, '(RFC822)')
            msg = email.message_from_string(data[0][1].decode('utf-8'))
            images = []
            for part in msg.walk():
                if part.get_content_maintype() == "multipart":
                    continue
                if part.get('Content-Disposition') is None:
                    continue
                if '_' in part.get_filename():
                    print_message('Found an advertisement, skipping it!')
                    continue

                filepath = IMAGE_OUTPUT_PATH + part.get_filename()
                fp = open( filepath, 'wb' )
                fp.write(part.get_payload(decode=True))
                images.append(filepath)
                image_count = image_count + 1
                fp.close()

            print_message ('Found {} mails and images in your email.'.format(image_count))

            if image_count > 0:
                all_images = ""

                for image in images:
                    all_images = all_images + image + " "

                print_message ("Creating animated GIF out of {} images.".format(image_count))
                os.system( GIF_MAKER_OPTIONS + all_images +
                           IMAGE_OUTPUT_PATH + GIF_FILE_NAME )

                print_message ("Cleaning up...")
                for image in images:
                    os.remove(image)

    if (image_count == 0):
        print_message("Found '{}' mails".format(image_count))

    return image_count

# Returns today in specific format
###############################################################################
def get_formatted_date():
    return datetime.datetime.today().strftime('%d-%b-%Y')

# gets packages count
###############################################################################
def package_count(account):
    count = 0
    today = get_formatted_date()

    rv, data = account.search(None,
              '(FROM "[email protected]" SUBJECT "Item Delivered" SINCE "' +
              today + '")')

    if rv == 'OK':
        count = len(data[0].split())

    print_message("Found '{}' packages".format(count))

    return count

# Prints message to console
###############################################################################
def print_message(message):
    print("{} USPS: {}".format(datetime.datetime.today().strftime('%d-%b-%Y %H:%m:%S%p'), message))

# OnConnect Callback
###############################################################################
def on_connect(mosq, userdata, flags, rc):
    print_message("Connected with return code: {}".format(str(rc)))

# OnLog Callback
###############################################################################
def on_log(mosq, obj, level, string):
    print_message(string)

# Primary logic for the component starts here
###############################################################################

# Primary logic for the component starts here
###############################################################################
try:
    while True:
        try:
            # create a new MQTT Client Object
            mqttc = mosquitto.Mosquitto()

            # Set event callbacks
            mqttc.on_connect = on_connect

            # Uncomment below line to enable debug/console messages
            # mqttc.on_log = on_log

            # Connect to MQTT using the username/password set above
            mqttc.username_pw_set(MQTT_USERNAME, MQTT_PASSWORD)
            mqttc.connect(MQTT_SERVER, MQTT_SERVER_PORT)

            print_message ("Connected to MQTT Server successfully")
        except Exception as ex:
            print_message ("Error connecting to MQTT.")
            print_message (str(ex))
            sys.exit(1)

        try:
            account = login()
            selectFolder(account, folder)
        except Exception as exx:
            print_message ("Error connecting logging into email server.")
            print_message (str(exx))
            sys.exit(1)

        # Get the mail count and drop it in the MQTT
        mc = get_mails(account)
        mqttc.publish(MQTT_USPS_MAIL_TOPIC, str(mc), qos=0, retain=False)

        # Get the package count and drop it in the MQTT
        pc = package_count(account)
        mqttc.publish(MQTT_USPS_PACKAGE_TOPIC, str(pc), qos=0, retain=False)

        # if there are no mails, make sure you delete the old file,
        # so that the next day, you don't see yesterday's mails
        # when there are no mails, copy nomail.jpg as your default file
        if mc == 0:
            os.remove(IMAGE_OUTPUT_PATH + GIF_FILE_NAME)
            copyfile(IMAGE_OUTPUT_PATH + "nomail.gif", IMAGE_OUTPUT_PATH + GIF_FILE_NAME)

        # disconnect from MQTT
        mqttc.disconnect()
        print_message ("Disconnected MQTT successfully. Will check your mails again in {} seconds.".format(str(SLEEP_TIME_IN_SECONDS)))

        # sleep for 5 minutes before trying it again
        time.sleep(SLEEP_TIME_IN_SECONDS)
except Exception as e:
    print_message ("Error occured while either processing email or publishing messages to MQTT.")
    print_message (str(e))
    sys.exit(1)
Running the above Python Program as a Service/Daemon
Note that the python program always runs background, it publishes the information in MQTT, and sleeps for a set time and starts allover again. In case of any error, the program exits, and the service will restart the program automatically. To create a daemon, follow the steps below:
Create a file called usps.service in /etc/systemd/system folder and paste the contents below:
[Unit]
Description=USPS Mail Retriever
After=network.target
Requires=network.target

[Service]
ExecStart=/usr/bin/python3 /home/homeassistant/.homeassistant/private/usps.py
Restart=on-failure
RestartSec=5

[Install]
WantedBy=multi-user.target
Make sure the path is correct, and run the following commands one after another to register and make it run automatically upon boot.
sudo systemctl --system daemon-reload
sudo systemctl enable usps.service
sudo systemctl start usps.service
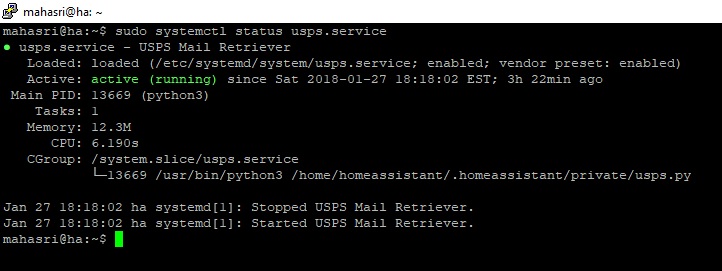
After running the above commands one after another, your service will be up and running. You can check the status of the service by running the following:
sudo systemctl status usps.service
Once the service is started, and when you check the status, you should see something like this:
To stop the service, run the command:
sudo systemctl stop usps.service
To restart the service, you can run the command:
sudo systemctl restart usps.service
Troubleshooting
Not working yet?
-
Double check the configuration data - like username (usually in the form of email), password, imap server host name, port, mqtt server information…etc.
-
Make sure the user has permissions to the folders and paths specified in the python program.
-
Make sure you have python’s paho mqtt libraries are properly installed.
-
Make sure you have the Imagemagick component is properly installed
- Before you run the program as a service, you should be able to run the program from the command line directly. If you see any errors while running the program via commandline, you need to fix them first. To run the program from commandline, simply run the following command - assuming the file name is
usps.py.$ python3 usps.py -
Make sure the file/folder paths are given correctly. The python code concatenates folder paths with filenames…etc. If you miss
/at the end of the folder path, or have extra characters, it might result in wrong or invalid file name and the python program may not like that. - Still running into issues? Add some debug statements in the python code and try it. You can also post a message in Community Forum and tag me as
@skalavala. Hopefully either myself or others can jump in to help you.
May the force be with you!